
Lesson 01
【Arduino連携編 その1】
こんにちは、管理人のomoroyaです。
Lesson 00にてProcessingをインストールしました。
Lesson 01はArduinoと連携して動かしてみます。
Processingの構文の理解は、まだしません!!
そのため、スケッチを見ても分からないかもしれません。
そこは、全て吹っ飛ばして、まずはどんなことができるのか体験です。
管理人、まずは遊んでみたいんです。
遊んで興味がわけば、学習もはかどります。
こんなことができるなら、あんなこともしてみたいという気持ちが学習継続の秘訣。
では、さっそく行って見ましょう。
Processingを始めようと考えている方。
ネット情報のみでも十分に学習可能です。
手元に参考書がほしいと考えている場合は下記の2冊程度で十分と考えます。


はじめに
連携と言っても何をしたらいいんだろう?
そこは、Arduinoの素晴らしいところで「スケッチ例」にサンプルがあります。
統合環境であるIDEに初めから、サンプルスケッチがありますので使っていきます。
そのサンプルスケッチを読み出して実行するだけ。
「Arduino」と「Processing」を連携して遊ぶことができます。
公式ホームページのチュートリアルに説明があります。

上記ページの「Built-In Examples」⇒「4. Communication」と移動してください。
Communication用のTutorialが色々あります。
この中から、Processingと連携できるサンプルスケッチを選んで遊んでいきます。
1.サンプルスケッチで遊ぶ。
2.どんなことができるのか体験する。
3.やってみたいことを想像する。
その後、本格的に学習していきます。
まずは、「4. Communication」にある「Dimmer」で遊びます。
日本語だと「調光」でしょうか。
「Dimmer」で遊ぶための回路
英語のサイトを読まなくても良いように本Lessonでは解説していく予定です。
英語が気にならない場合、公式ページを読んでいただいて遊ぶことができます。
先ほどの公式ページに実体配線図も記載されています。
「Dimmer」はデジタル入出力の9番ピンを使ってLEDを調光するためのスケッチです。
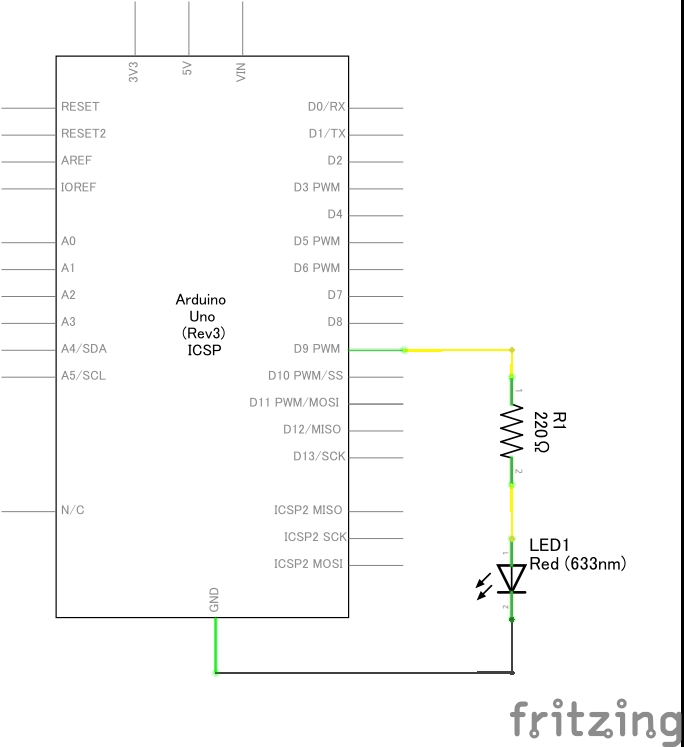
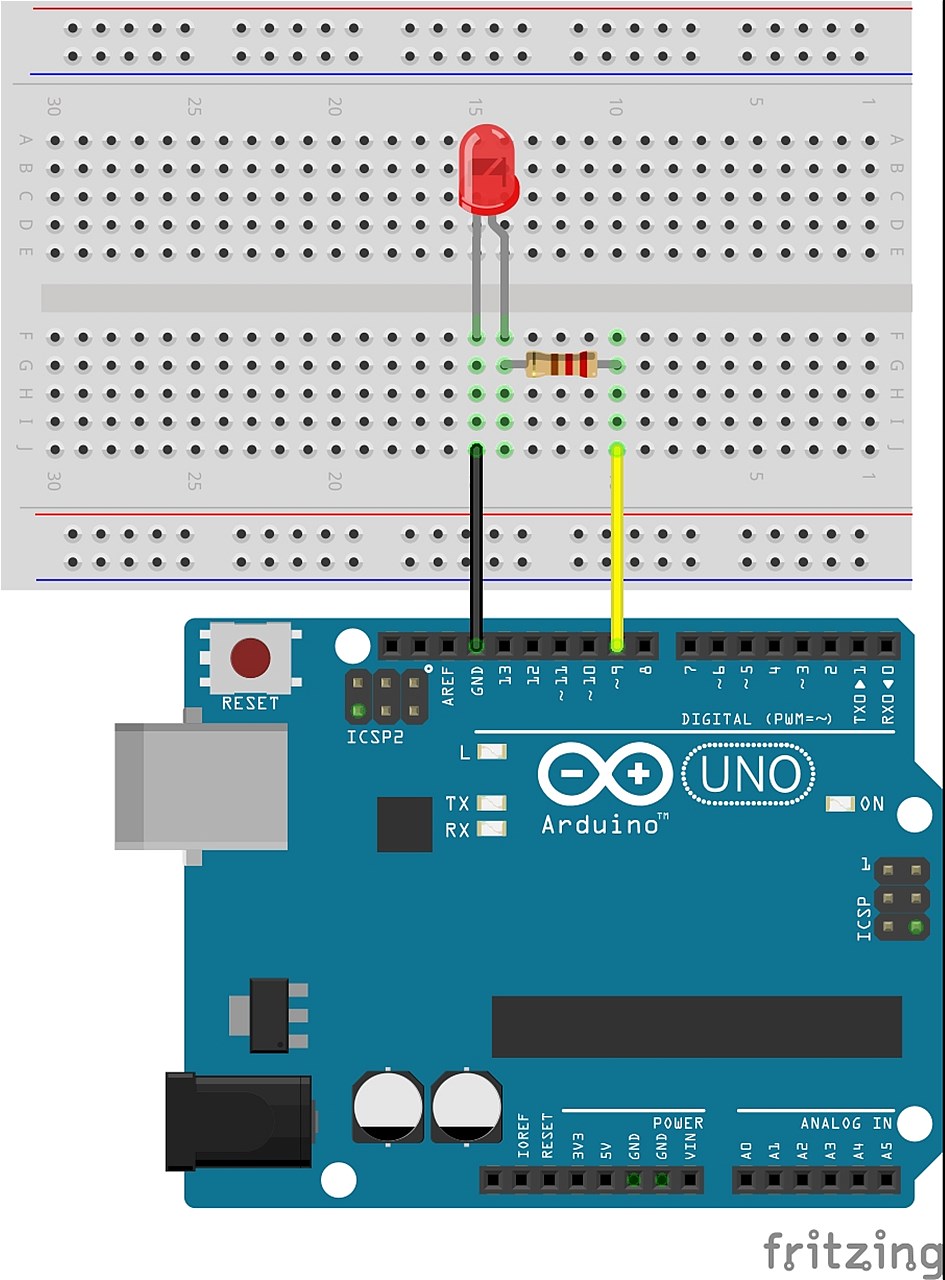
「Dimmer」に対応した回路図とブレッドボード図がこちらとなります。
管理人がFrizingを使って描いた回路図となります。
抵抗とLEDのみの単純な回路です。
抵抗はLEDの焼損を防ぐための電流制限抵抗のため実質LEDのみの回路です。
「Dimmer」サンプルスケッチ 読み出し
Arduinoの「IDE」を立ち上げてください。
以下で「Dimmer」のサンプルスケッチが読み出されます。
「ファイル」⇒「スケッチ例」⇒「04.Communication」⇒「Dimmer」
こちらが読み出したサンプルスケッチ。
下記サンプルスケッチはArduino用のスケッチとProcessing用のスケッチが記載されています。
Processing用のスケッチはコメントアウトされていますので、Processingの「IDE」にコメントアウトされた部分を記載すればよいだけとなります。
/*
  Dimmer

  Demonstrates sending data from the computer to the Arduino board, in this case
  to control the brightness of an LED. The data is sent in individual bytes,
  each of which ranges from 0 to 255. Arduino reads these bytes and uses them to
  set the brightness of the LED.

  The circuit:
  - LED attached from digital pin 9 to ground.
  - Serial connection to Processing, Max/MSP, or another serial application

  created 2006
  by David A. Mellis
  modified 30 Aug 2011
  by Tom Igoe and Scott Fitzgerald

  This example code is in the public domain.

  http://www.arduino.cc/en/Tutorial/Dimmer
*/

const int ledPin = 9;      // the pin that the LED is attached to

void setup() {
  // initialize the serial communication:
  Serial.begin(9600);
  // initialize the ledPin as an output:
  pinMode(ledPin, OUTPUT);
}

void loop() {
  byte brightness;

  // check if data has been sent from the computer:
  if (Serial.available()) {
    // read the most recent byte (which will be from 0 to 255):
    brightness = Serial.read();
    // set the brightness of the LED:
    analogWrite(ledPin, brightness);
  }
}

/* Processing code for this example

  // Dimmer - sends bytes over a serial port

  // by David A. Mellis
  // This example code is in the public domain.

  import processing.serial.*;
  Serial port;

  void setup() {
    size(256, 150);

    println("Available serial ports:");
    // if using Processing 2.1 or later, use Serial.printArray()
    println(Serial.list());

    // Uses the first port in this list (number 0). Change this to select the port
    // corresponding to your Arduino board. The last parameter (e.g. 9600) is the
    // speed of the communication. It has to correspond to the value passed to
    // Serial.begin() in your Arduino sketch.
    port = new Serial(this, Serial.list()[0], 9600);

    // If you know the name of the port used by the Arduino board, you can specify
    // it directly like this.
    //port = new Serial(this, "COM1", 9600);
  }

  void draw() {
    // draw a gradient from black to white
    for (int i = 0; i < 256; i++) {
      stroke(i);
      line(i, 0, i, 150);
    }

    // write the current X-position of the mouse to the serial port as
    // a single byte
    port.write(mouseX);
  }

*/
「Dimmer」 Arduino用のスケッチを抜き出し
Arduino用のスケッチ部分のみを抜き出したのがこちら。
下記をArduino用の「IDE」に記載してArduinoに書き込んでください。
/*
  Dimmer

  Demonstrates sending data from the computer to the Arduino board, in this case
  to control the brightness of an LED. The data is sent in individual bytes,
  each of which ranges from 0 to 255. Arduino reads these bytes and uses them to
  set the brightness of the LED.

  The circuit:
  - LED attached from digital pin 9 to ground.
  - Serial connection to Processing, Max/MSP, or another serial application

  created 2006
  by David A. Mellis
  modified 30 Aug 2011
  by Tom Igoe and Scott Fitzgerald

  This example code is in the public domain.

  http://www.arduino.cc/en/Tutorial/Dimmer
*/

const int ledPin = 9;      // the pin that the LED is attached to

void setup() {
  // initialize the serial communication:
  Serial.begin(9600);
  // initialize the ledPin as an output:
  pinMode(ledPin, OUTPUT);
}

void loop() {
  byte brightness;

  // check if data has been sent from the computer:
  if (Serial.available()) {
    // read the most recent byte (which will be from 0 to 255):
    brightness = Serial.read();
    // set the brightness of the LED:
    analogWrite(ledPin, brightness);
  }
}
「Dimmer」 Processing用のスケッチを抜き出し
Processing用のスケッチ部分のみを抜き出したのがこちら。
下記をProcessing用の「IDE」に記載してください。
/* Processing code for this example

  // Dimmer - sends bytes over a serial port

  // by David A. Mellis
  // This example code is in the public domain.
*/
  import processing.serial.*;
  Serial port;

  void setup() {
    size(256, 150);

    println("Available serial ports:");
    // if using Processing 2.1 or later, use Serial.printArray()
    println(Serial.list());

    // Uses the first port in this list (number 0). Change this to select the port
    // corresponding to your Arduino board. The last parameter (e.g. 9600) is the
    // speed of the communication. It has to correspond to the value passed to
    // Serial.begin() in your Arduino sketch.
    port = new Serial(this, Serial.list()[0], 9600);

    // If you know the name of the port used by the Arduino board, you can specify
    // it directly like this.
    //port = new Serial(this, "COM1", 9600);
  }

  void draw() {
    // draw a gradient from black to white
    for (int i = 0; i < 256; i++) {
      stroke(i);
      line(i, 0, i, 150);
    }

    // write the current X-position of the mouse to the serial port as
    // a single byte
    port.write(mouseX);
  }
「Dimmer」 サンプルスケッチの実行
実行手順が以下となります。
- Arduino用のスケッチ部分をArduino用のIDEにコピーしてArduinoに書き込み。
※回路接続のため電源供給を一旦止める。 - 回路作成しArduinoと接続。
- Arduinoへ電源供給
- Processing用のスケッチ部分をProcessing用のIDEにコピーして実行。
これで、問題なく動くはずです。
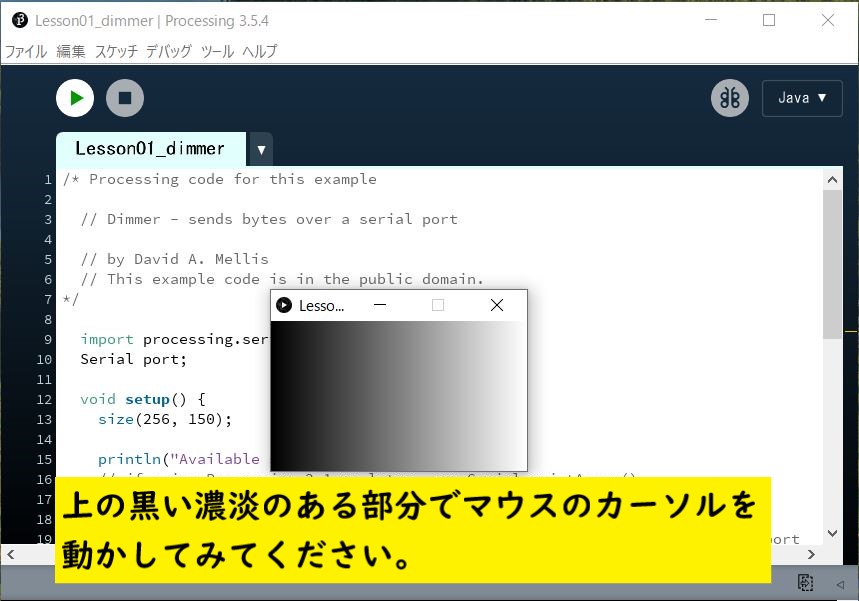
「Dimmer」 サンプルスケッチ実行結果
Processingを実行するとパソコンの画面中央に黒い濃淡がついたグラフィックが現れます。
色が濃い部分にマウスのカーソルを持っていくとLEDが暗くなります。
色が薄い方へ動かしていくとLEDが明るくなります。
グラフィックの濃淡に合わせてLEDが調光できるようになっています。
管理人の率直な感想。
お、お、おもしろい!
まとめ
Lesson 01【Arduino連携編 その1】はここまで。
Processingとの連携、面白いです。
次回のLesson 02もサンプルスケッチを使って遊びます。

Processingと連携しているスケッチは他にもいくつかありそうです。
しばらく、これだけで遊べそうです!
Processingを始めようと考えている方。
ネット情報のみでも十分に学習可能です。
手元に参考書がほしいと考えている場合は下記の2冊程度で十分と考えます。
最後に
疑問点、質問などありましたら気軽にコメントください。
この電子部品の解説をしてほしい!などなどなんでもOKです。
リンク切れ、間違いなどあればコメントいただけると助かります。
Arduino入門編、番外編、お役立ち情報などなどサイトマップで記事一覧をぜひご確認ください。
Arduino入門編、Arduino入門編2で使用しているUNOはAmazonにて購入可能です。
Arduino入門編では互換品を使用。
Arduinoはオープンソース。
複製して販売するのもライセンス的に問題なし。
そのため互換品の品質も悪くなく、それでいて値段は安いです。
正規品本体の値段程度で豊富な部品が多数ついています。
学習用、遊び用、お試し用には安価な互換品がおすすめです。
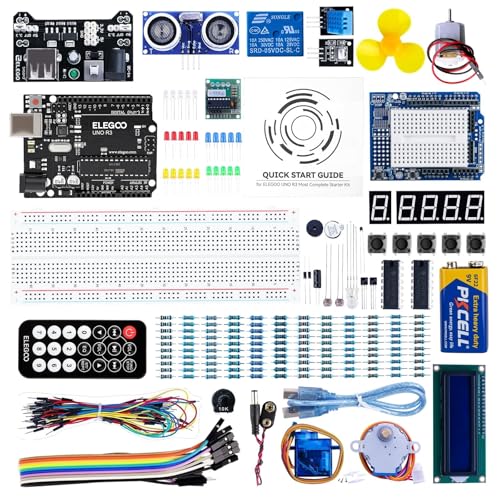
ELEGOO UNO キット レベルアップ チュートリアル付 uno mega2560 r3 nanoと互換 Arduino用
![ELEGOO Arduino用UNO R3スターターキット レベルアップ チュートリアル付 mega2560 r3 nanoと互換 [並行輸入品]](https://m.media-amazon.com/images/I/51qbScRA1AL._SL160_.jpg)


上記のものでも十分に多数の部品が入っていますが、最初からもっと多数の部品が入っているこちらもお勧めです。


Arduino入門編2では「Arduino UNO R4 Minima」「Arduino UNO R4 WIFI」にて遊ぶため今のところは正規品を使用。(まだ互換品が・・・ほぼない)
![Arduino UNO R4 Minima [ABX00080] - Renesas RA4M1 - USB-C、CAN、DAC (12ビット)、OP AMP、SWDコネクター。](https://m.media-amazon.com/images/I/41AF-Pi1ykL._SL160_.jpg)


Amazonでお得に買う方法
Amazonでお得に購入するならAmazon Mastercard、Amazonギフト券がおすすめです。
時期により異なりますが、様々なキャンペーンを実施しています。
\Amazonギフト券/
Amazonギフトカード キャンペーン
\Amazon Mastercard お申込み/
Amazon Mastercard 申し込み
いずれの場合もプライム会員である方がお得!!
\Amazon Prime 30日間の無料会員を試す/
無料会員登録


コメント
OMOROYAさま:
早速のご教示、ありがとうございました。
ProcessingIDEの初期設定でも注意喚起されたいたのに気づかず、失礼しました。
早速構文エラーはなくしたのですが、画面の黒濃淡部分にカーソルを当てても、LEDには何の変化も現れません。(消灯のままです。)
また、Lesson3「Physical Pixel」においても画面のボタンにカーソルを移動しても何の変化も生じません。(LEDは点灯のまま)
ほかのLessonでは正常に動くので、ArduinoIDE側からProcessingIDE側へはシグナルが届きますが、逆のProcessingIDE側からArduinoIDE側へのシグナルが届いていないと思われます。
MainのデスクトップPCだけの現象かとも考え、DynabookR734(ポート番号はCOM5)でも検証しましたが、同じ状況です。
双方のIDEの連携に何が欠けているのか、ご教示いただければ幸いです。
どうぞよろしくお願いします。
追伸です。:
Mega2560でLesson14「LEDの点灯 消灯」を試してみました。
シアルモニターからキャラクターを入力し、点・消灯を確認できましたが、Processing側からはうまく動きません。Mega2560のRX-LEDが反応しますが、D9への信号は入らないようです。
OMOTOYAさまが推奨されているELEGOO社のNano3個を入手し、こちらで試してみました。3個ともブートローダーはインストール済みのようで、素直に反応してくれました。
「Lesson1,Dimmer」「Lesson3,Physical Pixel」「Lesson14,LED ON-OFF」もすべて指定のとおり正常に動作しました。
色々お騒がせしましたが、ありがとうございました。
Mega2560だけがProcessingと相性が悪いのでしょうか?それとも私のMega2560の動作不良?
これは今後検証してゆきたいと存じます。
これからも貴社のサンプル例を参考に、勉強してゆきます。ご指導よろしくお願いします。ありがとうございました。
こんにちは。
Nanoでは動いたようで良かったです。
Mega 2560が手元にないので、こちらで確認できないのですが
何か思いつきましたら、再度コメントします。
追伸:
エラー原因構文を書き忘れました。
「println(Serial.list());」です。
ちなみに、ArduinoIDE側には「Serial.list()」はありません。
よろしくお願いします。
コメントありがとうございます。
下記のエラーは無視いただても、かまいません。
動作はしているはずです。
エラーを消したい場合はprintlnをprintArrayに書き換えてください。
IDEに格納されているサンプルコードはprintlnとなっていますが
これは古いProcessingのバージョンの構文となります。
最新バージョンはprintArrayが正しいです。
println(Serial.list()); -> printArray(Serial.list());
他のスケッチもprintArray(Serial.list());に変更ください。
OMOROYAさま:
貴社のホームページを知り、Aruduinoに興味を持った初心者です。
AmazonのタイムセールでMega2560のスターターキットを入手し、いろいろ遊んでいます。
貴社から大変参考になる多くの作例を紹介いただきありがとうございます。
今回のProcessingとの連携に挑戦しましたが、ProcessingIDEに下記のエラーが出ます。
「Type String[] of the last argument to method println(Object…) doesn’t exactly match the vararg parameter type. Cast to Object[] to confirm the non-varargs invocation, or pass individual arguments of type Object for a varargs invocation.」
接続PortがCOM12のためかとも思いましたが、Processing側でも認識しているとのメッセージが出ています。
スケッチはコピペですので、記述エラーとは思えません。
ご教示いただけると幸いです。
よろしくお願いします。